In other words, how to set up a pelican blog with github pages and pelican-bootstrap3.
In other words, how I made my blog.
Is the word blog starting to sound weird yet?
It seems like the first thing most people do after making a blog is write about how they made it. And hey, I have no complaints; this is a pretty useful practice. So I'll go ahead and give it a shot. I'm going to try assume basically zero knowledge of how to set up a website, because that's how about much I had going in. This will probably not go perfectly well as I start throwing around terminal commands and whatnot, but I will try my best. So, let's get started.
1. Get the Bird
First, let's install Pelican. Here's how.
Basically you just want to do pip install pelican or easy_install pelican.
If you want, you can create a virtual environment for Pelican before installing it.
The reason
for doing this is to create a self-contained python environment for
this python project. I didn't care about this, so I went ahead and skipped this
step.
1a. Markdown for What
If you plan on using Markdown as a markup format (which I recommend),
also install Markdown with pip install Markdown.
2. Quickly Start It
Navigate to the directory to where you want to create your blog. Let's say
you want it to be located at ~/Documents/blog. Then, you should do
cd ~/Documents/blog (run mkdir -p ~/Documents/blog if the directory doesn't
exist yet).
Then, run pelican-quickstart (for more details, refer again to the previous
link).
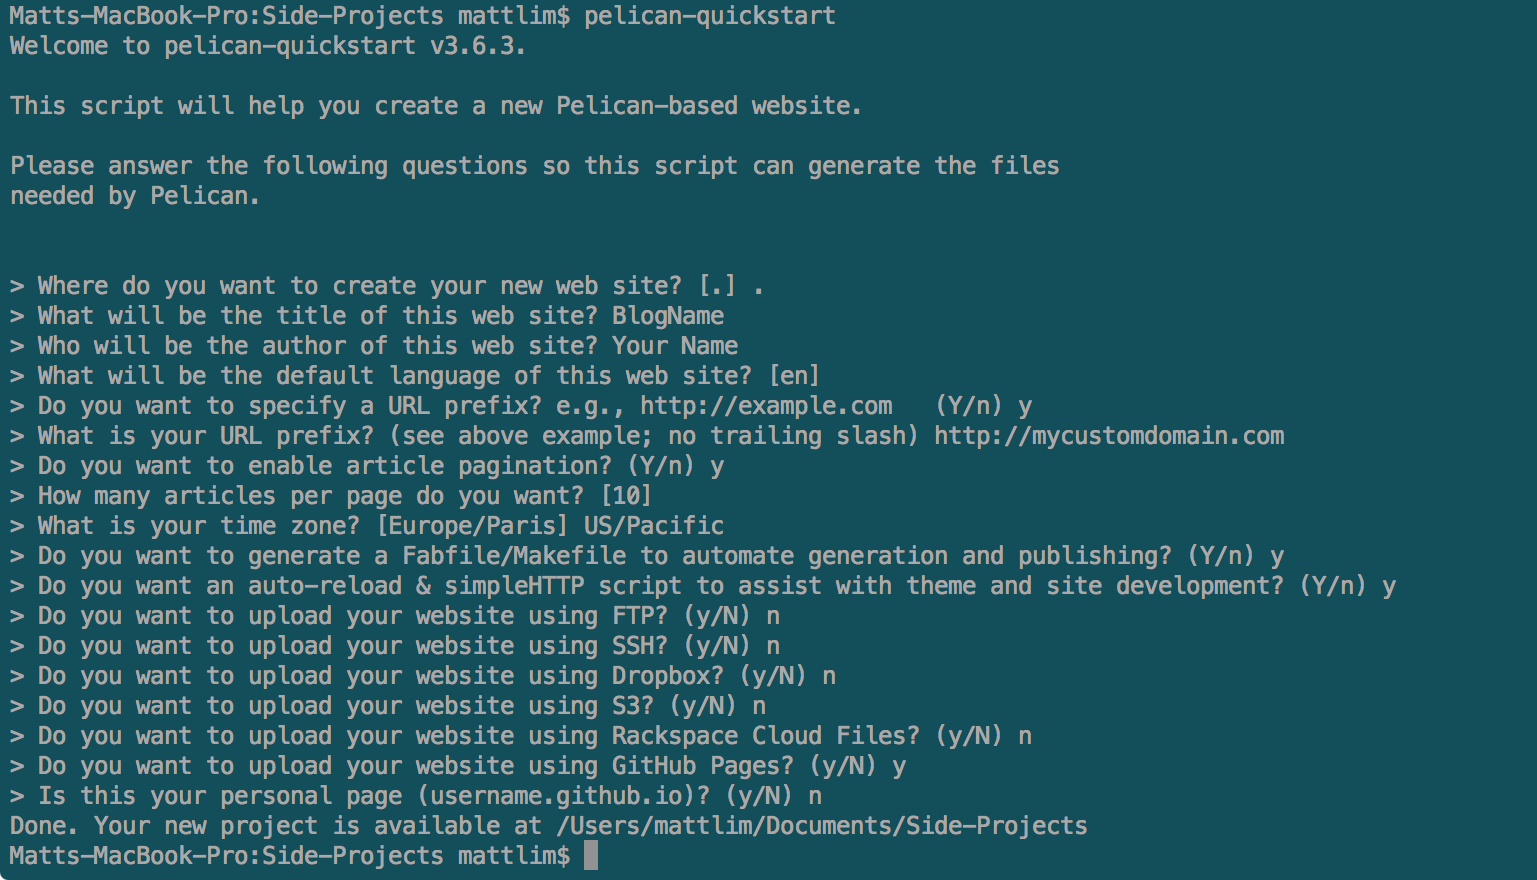
It will prompt you to answer some questions
about your site, as shown below.
 Here I answered "no" to the last question, where it asks us if we want to use
our personal page. This is just determining whether we want to use Github Page's
Personal Page, or Github Page's Project Page. The only practical difference is a
slight change in setup, so it doesn't really matter. But for the purposes of this
how-to, I'll be showing how to set up the Project Page.
Once all these questions have been answered, your project should be all set up,
and the structure should look like the following:
Here I answered "no" to the last question, where it asks us if we want to use
our personal page. This is just determining whether we want to use Github Page's
Personal Page, or Github Page's Project Page. The only practical difference is a
slight change in setup, so it doesn't really matter. But for the purposes of this
how-to, I'll be showing how to set up the Project Page.
Once all these questions have been answered, your project should be all set up,
and the structure should look like the following:
yourproject/
├── content
│   └── (pages)
├── output
├── develop_server.sh
├── fabfile.py
├── Makefile
├── pelicanconf.py       # Main settings file
└── publishconf.py       # Settings to use when ready to publish
2a. Make Your Life Better
There are some automation tools that wrap the pelican command and make
it easier to generate, preview, and upload your blog. Again, the previous
link details
these tools. One of them is Fabric. However, I recommend Make. A Makefile
is automatically generated for you if you say "yes" to one of the prompts
during the pelican-quickstart process, and the make command is already
built into most systems. The most handy command is make devserver. This
will serve your site at http://localhost:8000,
and automatically regenerate it when you make changes. So for example,
if you save a new article, you just need to refresh the browser to see
the results! Pretty sweet. When you're done testing, you should run
./develop_server.sh stop to stop the development server.
3. Push It Real Good
Now we basically have all our Pelican stuff set up. What's left? Well, we
need to integrate it with Github Pages, and get our custom domain name. So let's
get started. First, go onto github and create a new repo. Initialize the repo
in the directory where you created your blog, and then stop.
So in other words, just run these commands (with your directory):
cd ~/Documents/blog
git init
Now we're going to set it up so that the Pelican site gets published as a Github
Project Page, following these instructions.
There's some stuff at the top of that page about publishing to Project Pages,
but we can skip it and use a shorcut method. Here's what we'll do. Run
these commands, and I'll explain after. For these to work, you'll need to
be in the root directory of your blog.
pip install ghp-import
cd .git/hooks
echo "pelican content -o output -s pelicanconf.py && ghp-import output && git push origin gh-pages" >> post-commit
chmod +x post-commit
Then navigate back to the root directory of your blog.
What we are doing is setting up a post-commit hook, which makes it so that
the Pelican site gets updated on each commit. This means that we can work
on our site on the master branch. Then, whenever we want to update the site,
we just add the relevant files and commit. ghp-import will then push the content
of the output dir to the gh-pages branch, and that's that (the gh-pages branch
is what's used for a Github Project Page).
So now that we've got that set up, we can run git add -A to add all our files,
and then run git commit to update our site! It's as easy as that. Remember to push
to master occasionally if you want to update your remote branch.
4. Maybe You Should Start Thinking Of a Cool Domain Name...
At this point, you should be able to test your blog using make devserver and
looking at http://localhost:8000. You should also be
able to easily update the Github Project site by simply commiting to the master
branch. So all that's left is getting that custom domain name. The first thing
we'll do is navigate into the content/ directory of our blog and run
mkdir extra. Inside the newly created extra directory, put your desired
custom domain name into a file called CNAME. So for example, CNAME could
have one line with
blog.example.com
Then, in pelicanconf.py, put these two lines:
STATIC_PATHS = ['images', 'extra/CNAME']
EXTRA_PATH_METADATA = {'extra/CNAME': {'path': 'CNAME'},}
This tells Pelican to copy the CNAME file to your output directory.
After running git commit to update your site, take a deep breath. You're almost
there!
5. Good Choice. I Heartily Approve
The last step involves actually purchasing and setting up your domain (and
possibly subdomain) on godaddy.com. Or some other
site. But godaddy.com is pretty swell. First you have
to buy the domain name you want. So do that. I can wait.
...
Ok, so you've got your domain. Great! Now log onto Godaddy and go to that
domain's DNZ Zone File (first go to Manage My Domains, then click the settings dropdown
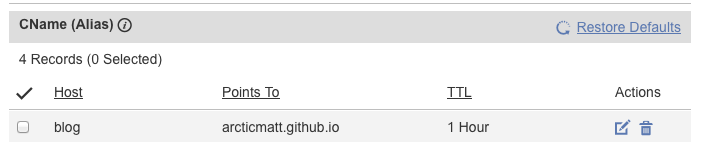
for that domain, then click Manage DNS). Now find where it says "Add Record"
right under "Zone File" and click that. Now just add a CNAME record that
points to your Github URL (for the host, put the subdomain). It should end up
looking like this (this is for my blog.pencilflip.com site).
You might have to wait a bit for all the Godaddy stuff to take effect, but after that,
you should be able to go to yoursubdomain.yourblogname.com, and see your beautiful
blog in action.
6. Make It Look Cool
The rest of this is really optional. It's just a matter of giving your blog
a nice theme, specifically this one.
This theme is nice because it's heavily documented (always a HUGE plus), looks
nice, and is very flexible.
Most of the instructions are pretty self contained in that link. You basically
just clone the repo, and set up some variables in your pelicanconf.py.
I'll just mention the useful stuff I've found so far. If you want to display
tags on the sidebar, make sure to install the plugin tag_cloud. You can do
this by clonining the pelican-plugins repo and putting the following two lines
in your settings:
PLUGIN_PATHS = ['../pelican-plugins']
PLUGINS = ['tag_cloud']
If you want to mess with the CSS, put the following lines in your settings:
CUSTOM_CSS = 'static/custom.css'
EXTRA_PATH_METADATA = {'extra/custom.css': {'path': 'static/custom.css'},}
The latter of these two lines changes the path of custom.css to static/custom.css
in the output directory.
Here's my current custom.css setup. In order, this code changes the background
color of the navbar, changes the background color of the navbar when active,
and adds some icons for social links (goodreads and bandcamp). It's pretty easy
to mess with stuff by just inspecting elements and adding things to this file; at least,
that's what I did.
.navbar-default {
    background-color: #fdf6e3;
    border-color: #F5F5F5;
}
.navbar-default .navbar-nav > .active > a,
.navbar-default .navbar-nav > .active > a:hover,
.navbar-default .navbar-nav > .active > a:focus {
    background-color: #F8E8BD;
    border-color: #fdf6e3;
}
.fa-goodreads-square:before {
  content: "\f02d";
}
.fa-bandcamp-square:before {
  content: "\f001";
}
I hope this was at least a little bit helpful. If you have any comments or questions, ask away.
Comments
comments powered by Disqus